TIPniques: Sheet Set Manager, Part 3
In this last portion of the series on drawing documentation, we'll talk about printing, publishing, and archiving the document set using the Sheet Set Manager. This is one of the most crucial parts of the project - when all things are drawn and you are ready to print, publish, and archive. These three always go together to ensure a properly documented set of drawings from schematic to design development and through the construction documentation phase. When it's time to issue the drawings, you print!
Traditionally, the most common way to accomplish this is to open each sheet file and invoke the print command by clicking on the print icon or the printer symbol on the Quick Access toolbar (see Figure 1). This is a good method to use when you are printing only a few sheets, say, 10.
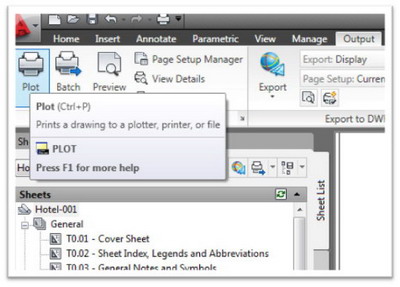
Figure 1: Printing from the Quick Access toolbar.
However, a full set of drawings will amount to at least 100 sheets. If you print this in the manner described above, it will take forever. Autodesk found a way to batch print a set of drawings, which is accessible through the Sheet Set Manager. This truly is a magnificent breakthrough! I remember those times opening and closing each file one at a time to print to a plotter or to a file. It was an excruciating experience. Then came those batch plot routines that sometimes work and most of the time don't. Thankfully, those are things of the past. We are now blessed with the future generation of AutoCAD.
The new method of printing and/or publishing to a file or printer is accessible through the Sheet Set Manager. Simply right-click on the project name, such as Hotel.001 shown in Figure 2 below. A flyout dialog box appears. Scroll down to the Publish suboption and another flyout appears. This is where we can select the medium into which we want to print the files.
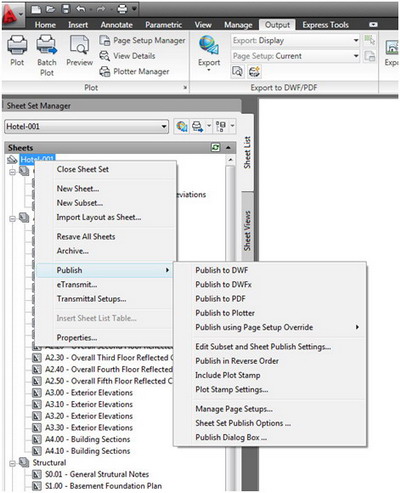
Figure 2: AutoCAD enables you to batch print a set of drawings.
There are three file options. We can publish as DWF, DWFx, and PDF files. As universal as PDF seems to have become, my own preference is DWF. DWF files are much lighter and more flexible in terms of markups and turning layers on and off. I wonder why there seems to be a small crowd using this DWF. This may change soon in the CAD world, however, as the DWFx can now be viewed in Microsoft Internet Explorer.
The fourth option is to publish to plotter, which publishes to any available plotters or printers within the network or even to a file with single or multiple sheet options. All these options are accessible and can be changed in the Sheet Set publish options. This is where you add output file location, be it in the network or the local drive. I prefer saving it to the local drive first for faster performance then move the files later when done.
You can also enable the password protection so not everyone can open and print the files. Other sheet set information can also be added by changing options to include them. In the Manage page setup, you can set the page size and orientation, the printer/plotter preference, print scale, and plot style table to use. Once it is set, all the sheets will be printed using these presets.
In the Publish Dialog Box, sheets can be added in the list of items to be printed and can also be removed from the list. This also gives you the flexibility of rearranging the order if necessary. The default order is according to the Sheet Set Manager's list. There is also a precision option where you can tell AutoCAD the quality of the printout. Here you can change printing resolutions and the units on which it can be printed. This supersedes the prior settings, which is very convenient. The regular plot stamp can be added as well in this dialog box.
The next important item in the list is the eTransmit, very powerful feature. eTransmit is used for collecting and compiling all the drawings into one folder or a single compressed file so one can issue it as a comprehensive set. And it is all done automatically. All the sheet files, external references, and even attached images and data are included with no hassle at all.
Again, you have the option of selecting the files you want to add or remove from the list. The default is that all files in the Sheet Set Manager get checked for eTransmit. A standard transmittal setup is initially used, but this can be changed or new setups can be added.
Click Transmittal Setups and hit New or Modify. This takes you to a new dialog box, "Transmittal Setup," where you can change parameters. The first option you want to check is the transmittal package type. This gives you three choices: a folder set of files, a self-extracting file, and a zip file. I normally use the zip file where everything is compiled into one compressed file. A zip file is also allowed in most servers when you send files out as an email attachment as opposed to the self-extracting file. Some servers reject attachments with .exe extensions as most hackers use this format to distribute malicious files. So if you use the .exe format and email it, don't be surprised if your intended recipient doesn't receive it. The folder set of files option allows you to save all the collected files in a unique folder where you can sort out the files later. This is another handy feature.
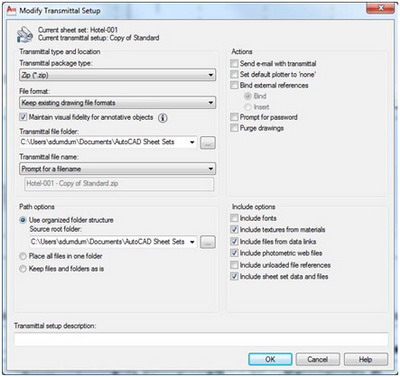
Figure 3: Modify Transmittal Setup dialog box.
Finally, I'll address Archiving. In the same manner as above, the Archive option is accessible in the Sheet Set Manager. Archive enables you to archive files as we progress through the design process. The initial dialog box provides a list of all the drawings, xrefs, and attached images to be included in the archive. Uncheck items as you wish. This routine of archiving is really the same as eTransmit. You'll notice that the modify archive setup option at the bottom is the same as the one in eTransmit. A good practice is to archive files right after publishing/printing.