TIPniques: Sheet Set Manager for Drawing Mgmt.
The latest release of AutoCAD is a complex program, covering a wide variety of applications in the design industry. My field of expertise happens to be in the Architecture and Interior Design realm, so my topics will gear toward this. I'll address three main issues in this article series: Drawing Documents Management, Design and Drafting, and Presentation and Collaboration.
Drawing Documents Management
Prior to starting to draw, the most effective way to begin a new project is to formulate a system to manage drawings and files. Specifically, the use of different folders and subfolders for the various types of drawing files in a most comprehensible structured approach is the ultimate goal. The naming of the folders and subfolders should intelligibly pertain to the precise usage of the files it will contain.
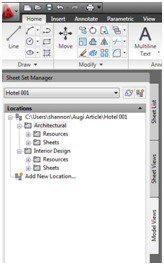
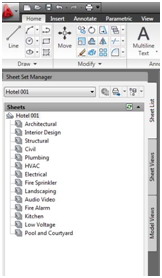
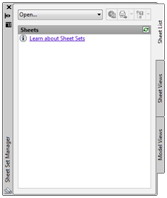
Two major categories in the folder arrangement are the Sheets and Resources (see Figure 1 below). The folders are segregated according to discipline. The Sheets folder will obviously contain the sheet files. Within this Sheets folder, subfolders can be created for other purposes such as coordination sheet files. As illustrated below in Figure 2, the Sheet List tab indicates separate subcategories for each discipline. The Sheet Set Manager is the perfect tool in setting this up. This is the most convenient way to access and manage all AutoCAD drawing files. To invoke this command, simply click on View in the top menu bar and click on the Sheet Set Manager icon (see Figure 3 below).
 |
 |
| Figure 1 | Figure 2 |
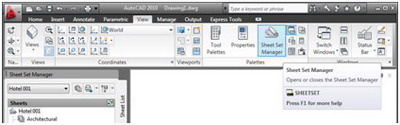
Figure 3
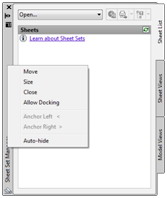
Immediately after clicking on the icon, an empty Sheet Set Manager dialog box appears as shown in Figure 4, which is in the floating mode. This can also be placed in docked mode to the left or right hand sides of the drawing editor. To dock the box, simply right-click anywhere on the gray portion on the left where it says Sheet Set Manager (see Figure 5). A new selection list will appear; click on Allow Docking. Right-click again on the same gray bar and note that Allow Docking is now checked (see Figure 6). Below that are two options, Anchor Left and Anchor Right, so click on the option you prefer.
The Sheet Set Manager consists mainly of the side bar, the open/new sheet set pulldown at the top with options beside it, then the tabs on the right side as follows: Sheet List, Sheet Views and Model Views. Working with these three tabs together is the most productive and efficient way to access, manage, and move any drawing for the project. Leave this dialog box open so you become familiarized and get the most out of it. That's how I got used to it.
 |
 |
| Figure 4 | Figure 5 |
 |
|
| Figure 6 |
With that knowledge, we can now to begin to set up a new project. You can either create a new sheet set or open a new one by clicking on the pulldown (see Figure 7 below). Let's click on New Sheet Set for now. A new dialog dialog box appears – Create Sheet Set. Notice there are four steps to complete this task listed on the upper left corner: 1) Begin (which is where we are now), 2) Sheet Set Example, 3) Sheet Set Details, and 4) Confirm.
The Begin step gives you two options to create a sheet set, either by an example sheet set provided by Autodesk or by choosing an existing drawing you already have. Let's choose the first option, which will bring us to the next step as shown in Figure 9. Autodesk provides six comprehensive working sample sheet sets. Use one of these if you're a beginner in the sheet set realm. Then you can tweak them later on to suit your own and save as your template for future projects.
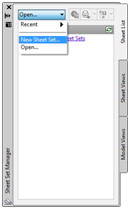
Figure 7
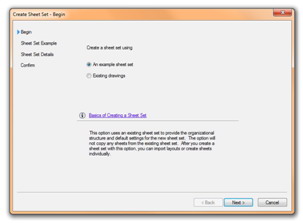
Figure 8
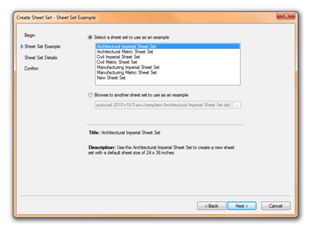
Figure 9
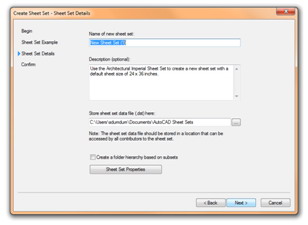
Figure 10
As I am more familiar with the building design profession, let's use Architectural Imperial Sheet Set for now. Imperial is what we are used to here in the US. There is also an option to browse and use an existing sheet set, which is similar to opening a sheet set back in Figure 7. Moving on to Figure 10, the Sheet Set Details step allows us to provide a specific sheet set name. Intuitively used here is the unique project name spelled out in its entirety to avoid confusion with other similar projects with the same name in different locations of the globe. Figure 11 shows a preview of the Architectural Sheet Set prior to finalizing. When all are confirmed, click on Finish on the lower right-hand corner of the dialog box. Figures 12 and 13 show the Civil and Manufacturing profession sheet setup.
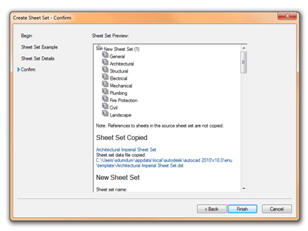
Figure 11: Sheet Set - Architectural
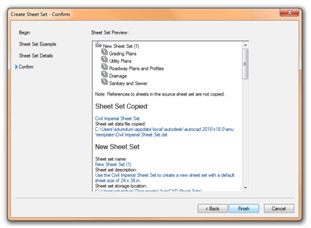
Figure 12: Sheet Set - Civil
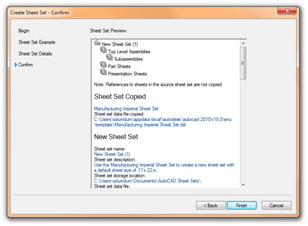
Figure 13: Sheet Set - Manufacturing
Once you hit Finish, the final Architectural Sheet Set appears similar to Figure 2 above indicating all other professions in the field as you continue to modify and update the sheet set. This is a continuous process of addition and subtraction as you progress into the different phases of design and construction documentation. Henceforth, I named this project Hotel-001.
As illustrated in Figure 14, if you right-click anywhere inside the Sheet Set Box, several options appear in the flyout. All the tools you need in the sheet set are accessible just by a right-click of the mouse. This is the quickest way to access most of the tools in AutoCAD. Master this right-click motion on all the areas of the drawing editor and you'll discover tons of items (mostly the repetitive commands) you can find here instead of painstakingly browsing through the pulldown menus and ribbons. I’m sure no one has memorized all those icons yet!
Right after you right-click on the sheet set manager, click on Properties. A new Sheet Set Properties dialog box appears as shown in Figure 15. Here you can modify values of the Sheet Set Name, description, project name and number, and so on. These values or fields can be entered into the title block so that when this gets changed, every field using these values will automatically change.
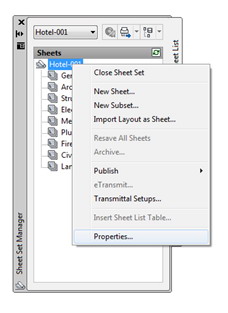
Figure 14
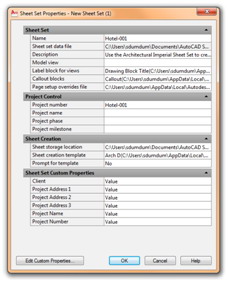
Figure 15
Click OK when you are done editing all the required fields. Below the Sheet Set name are categories which AutoCAD calls Subsets. In each of these subsets, you can add new sheets. Again with the right-click of the mouse inside this box, click on New Sheet as the flyout appears. This brings up the New Sheet dialog box as shown in Figure 16 below. Here you can start adding new sheets in each subset beginning with the General sheets "T0.01" or whatever sheet numbers your company standards contain. Sheet number and Sheet title can be filled in as you desire. Notice the filename box begins to get filled in by the sheet number plus the sheet title to comprise the full filename. This will be the default filename that AutoCAD will use to save this sheet unless you change it.
Add in all the sheets required for the documentation phase of the project (see Figure 17 as a sample). If the sheets ended up in the wrong subset, just click, hold and drag them below the desired subset, keeping an eye on where the horizontal bar falls. This is where the file will be moved into.
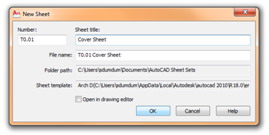
Figure 16
With this Sheet Set Manager all set up, you can access all the drawings in this sheet list tab. Double-click on the sheet and it will automatically open in the drawings editor without going through finding them in the drives and folder locations. It's a very productive way to find drawings and minimize wasted time searching through nested folders. The next topics I will tackle are Sheet Views, Model Views, and Publishing using the Sheet Set Manager.
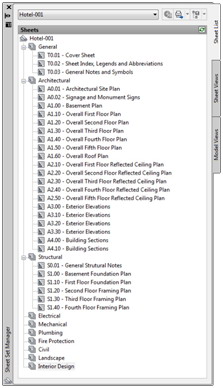
Figure 17