TIPniques: Measuregeom
Often we think of AutoCAD as a drafting tool. AutoCAD and other CAD programs are more than tools to help us draw annotated lines and arcs. AutoCAD is a design tool and a database manager. We often think of data as numbers, or names, but in AutoCAD, data also includes linework. The linework in our drawings are why we make them. Geometric data can convey or demonstrate our ideas in a better way than words and numbers. We can also generate numeric data from our geometric data, such as length, area or volume. AutoCAD has many tools available to us to discover that information. On example, in AutoCAD 2010, is Measuregeom. It is an all-in-one tool that can make different types of geometric measurements of our data.
The Measuregeom command allows you to get geometric data on selected objects and with sequences of point selections without having to use multiple commands and without having to write down data to later computation. Many of the functions Measuregeom has in it are available through existing commands such as area, distance, and massprop. Think of it as a one-stop shop for your geometric data needs.

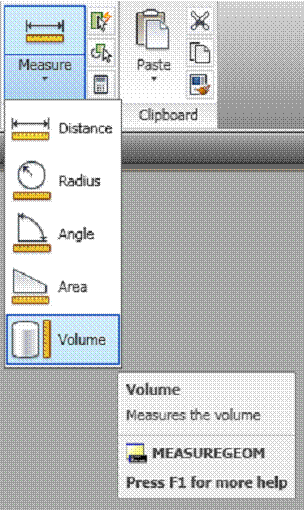
Figure 1: The first set of measurement options in the Measuregeom command as accessed through the Ribbon.
What can Measuregeom do for you?
There are five basic geometric realms in which Measuregeom can provide data: Distance, Radius, Angle, Area, and Volume. All five areas work in a similar fashion, so once you learn one, you can use the others - especially area and volume. The volume tool is exactly the same as area, only it adds height into the mix.
Distance
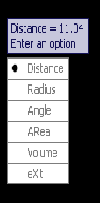
This option measures the distance between specific points. It can be as few as two points and as many as desired. The Distance command (DIST) is quick and will give the measurement between two points. But there are times when we need the accumulative distance between more than two points. After you have chosen the distance option in Measuregeom, you are asked to specify your first point. After doing so you can enter your second point, or type M for multiple points. As you pick more and more points, the total distance measured will be displayed for you.

Figure 2: The total distance measured is displayed near your cursor.
Radius
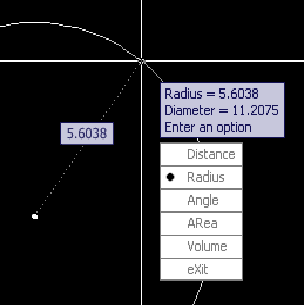
The radius option in Measuregeom will provide you the radius and diameter of an arc or circle. Pick the Radius option, then select your arc or circle. The radius along with the diameter of the object will be displayed.

Figure 3: The radius option of Measuregeom provides the radius and diameter of a circle or arc.
Angle
Most of the options in Measuregeom are obvious, and the Angle option is no different. These options are getting a bit more complicated to use than the distance and radius options. There are a few different methods to using the angle option. By default, you can simply pick two objects and Measuregeom will give you the angle between them. This is very quick. Another method available is to select the vertex. To do this, type S on the command line to select the Vertex. Pick a point. That point will be the vertex of your angle. Then pick a second point. These two points will form your base line to measure an angle from. Then you pick a third point which will define the second leg of your angle.
You can also measure the angle of an arc. Measuregeom will treat the center point of the arc as the angle's vertex. Simply select the arc and Measuregeom will give you the angle, or delta, of the arc's endpoints with its center as the vertex. If you select a circle, its center will be the vertex of the angle, and your first selection point (where you picked the circle) will form your angle base line. Pick a second point on the circle to form the angle to measure.
Area
There are two main ways to determine the area of an object or objects. The easiest is the object method. Start the Measuregeom command, select the Area option, then type O for Object. Now select the object. It can be any shape as long as it is a closed object, like a circle, polygon, or region. Measuregeom will display the area and the perimeter of the object. This isn't new or all that special a feature because if the Properties Pallet is open and an object is selected, the same information will be displayed.
Instead of picking an object, pick points to define a shape to find its area. Just start picking points and press enter when finished. Measuregeom will display the area of the shape you defined. However, with Measuregeom, you can add or subtract from the total area. Before you start picking your points, type A for ADD. Now pick your points for the total area. Type S for subtract and pick points in your original shape to subtract this shape’s area from the first. If you look at figure 4, you will see a shape that has been selected. This is the green area. The brown areas have been subtracted and a new total area (and perimeter) are given.
.gif)
Figure 4: Measuregeom's Area option has given us the total area (and perimeter) of this shape. The areas shaded brown have been removed from the shape’s measurement. The new area is displayed. (Click on image to enlarge.)
Volume
Measuregeom’s volume option works the same way as the Area option. At the end, you will be asked for a height. Type it in and the shapes volume will be displayed. This option is limited in that it can only work with a uniform height for the entire shape. If your object's height varies, then you will have to take a few extra steps to determine the volume.
Conclusion
AutoCAD objects contain a lot of data in them that is needed for construction purposes. Knowing the tools that can give you that information is vital. The Measuregeom command gives you more options than were there before in AutoCAD. It can measure distance, angles, area, volume, and radius length. Using these tools will help you measure your data more accurately and more efficiently.