TIPniques: How Do You Use AutoCAD?
AutoCAD has been around since 1982. It has become the industry standard in filling the drafting needs in several design genres. It is used by professionals, designers, and students around the globe. It is used by architects, civil engineers, machinists, graphic artists, clothing designers, and on and on.
Are you using AutoCAD to its, or better yet, to your fullest potential? There are several hundred commands and settings in AutoCAD. How many do you use? I would bet that there are several commands available to you that you aren’t using. Why? Because you don’t know they are there. When (if) you update to the next or newest release, do you watch the New Features Workshop? Did you know there was even such a thing?
This month's "TIPniques" article will examine the commands that you may not know are there. We'll also go through some common commands and show you some things about them that perhaps you didn't know could be done. I want to give a big thank you to everyone who helped me come up with this list.
Are you automated?
AutoCAD software's main benefit is its automation in the drawing and design process. The current release, AutoCAD 2010, has the greatest amount of automation in it, but you might not be using that version. There are some basic automation tools in AutoCAD that have been around for many releases. One of them is the template file. A template file allows users to start a file off with several settings already set. Another type of automation tool is the style. Many commands, or drawing object types, have styles. Perhaps the two most used are text styles and dimensions styles. Blocks have been around for a very long time too. And don't forget dynamic blocks and annotated blocks. Both can provide a ton of automation. Fields can get you info right away without even trying. Through in tables and sheet sets and your workload probably just went way down.
Reference Manager
No, I don’t mean the Reference Manager in AutoCAD where you can manage all of the other files your current files is “xreffing”. I mean the Reference Manager that you can get to through Windows Start>Programs>Autodesk>AutoCAD XXXX>Reference Manager. You can do a lot with this external tool and without having to open AutoCAD. You can recover referenced files, change file paths, and update broken paths. One of the best features is the Find and Replace Selected Paths. This feature locates all references that use a specific pathway and replaces it with a different pathway. If you need to use a new master layout file for your design, don’t change each drawing file individually; use this “batch” change feature. This could be a huge time saver.
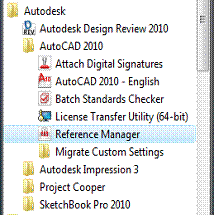
Figure 1: The Reference Manager is a standalone program that is run outside and separately from AutoCAD.
Publish... everything!
When a job is ready to plot (print) do you still open each file, and each tab, one... at...a...time? Or do you Publish your drawings? If you use Page Setups (which you should) then you can batch plot an entire set of drawings in one try. Create a list of your drawings and have AutoCAD's Publisher plot them all for you. Type PUBLISH on the command line to start the process. It can print model space drawings, paper space drawings, landscape, and even portrait drawings. Have different paper sizes? No problem. As long as you set your page setups properly, Publisher can handle it. You can publish your sheet sets, too.
Aerial viewer
This command can be very useful to help you navigate around a large drawing. Type dsviewer on the command line to start it. It opens up a new window that displays the entire drawing for you to see. In this window is a smaller window that indicates your current view. Move that window to pan the drawing. Zoom in and out in the viewer to, well, zoom in and out of the drawing view. You can use the Aerial View window to quickly change the view of your current viewport. It even allows you to pan/zoom without interrupting your current command. It's another tool that can help you work more quickly, especially in large files.

Figure 2 (click to enlarge): The Aerial View window is used to navigate a drawing file very quickly and in a way that won't interrupt your current command.
Command line options
Many of us use the Ribbon, toolbars, tool palettes, or even the pull-down menus to execute commands. Even if you don't use the command line to type in your commands, many of them still have command line options available to you. Two that come to mind are the CIRCLE and OFFSET commands. The Ribbon and toolbars have different buttons to press that allow you to create a circle in different ways, other than the default center point-diameter(radius) method. Some of the options are 2 points, 3 points, and tan-tan-tan. If you start the circle command, you will see these options ready and willing to be used through keyboard commands. Simply follow the command line's instructions and you can draw a 3-point circle (type 3P after you start the circle command.)
The offset command is similar. Normally, an object is offset, or copied in a parallel direction at a certain distance. The new object has the same color, linetype, and layer settings as the original object. That doesn't have to be the case. Through the command line options available, you can offset to the current layer, delete the original object, or offset to a specific point and not a distance. Type in the options available to you, they are right there on the command line. Make sure to look for other command line options in other commands as you use AutoCAD.
Many object snap options
Hopefully you are using object snaps to create accurate linework. If not, then how are you getting your lines and arcs in the right place? There are many options available to you when using Osnaps. Running Osnaps are great. This setting keeps your Osnaps on all of the time. You can select which osanps to run with. You can also turn on Polar Tracking and Object Snap tracking. Polar Tracking is a sort of Ortho option that allows you to “snap” your cursor to a specific angle. You can use the default angles or add the ones you want to use. This is a great tool if you want to draw an isometric view of your design. Object Snap tracking allows you to “snap” to virtual osnap points. It can extend lines to virtual intersection points that aren’t normally available. It can force your cursor to draw perpendicular from and objects midpoint! To get to these settings and all of your osnap settings, type OS on the command line.
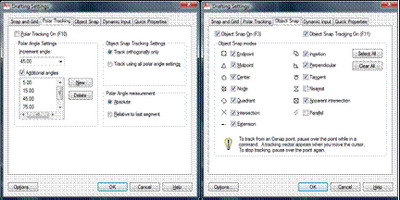
Figure 3: Left - The Polar Tracking Tab of the drafting settings window. Set the angles you want to snap to. Right - The Osnap Settings tab. Pick which osnaps you want to have running, and turn on/off Object Snap Tracking.
Other "secret" commands
There are so many commands you might not know about in AutoCAD. We don't have enough room in this article to cover them; perhaps we will visit this topic another day and discuss other commands. One way to help make sure you know of new commands is to go through the New Features Workshop. This will give you an overview of the new features of the release you are using. It even goes through the past several releases in case you skipped a few. If you are curious about some other tools or commands, try right-clicking on objects or while you are in the Layer Manager. Hold the Shift key down while you select objects, or use the scroll wheel on your mouse. Press the function keys and see what pops up. You could come across something new that will help you become a better CAD user.