The Civil Side: Loosening the Ribbon
Just like you, I love the ribbon! Well, perhaps not "just like you." In fact, almost everyone I asked during my training classes and in conversations has said they did not like the ribbon, at least not at first. After I explain why I like the ribbon and why I find it useful and after they give it a chance, most users begin to like the ribbon as well. In this article I will show you how to customize the ribbon and make it more like you want it. It doesn't matter if you are a user of AutoCAD Civil 3D, AutoCAD Map 3D or AutoCAD - this lesson is relevant to all three products and the other AutoCAD vertical products as well. One of the reasons Civil 3D can be challenging to learn is the fact that it is built on top of Map 3D, which is built on top of AutoCAD. Between these three products there are a very large number of commands and functions to learn and use inside of Civil 3D.
When the ribbon was first introduced in Civil 3D, I looked at it briefly and then turned it off, perhap for no other reason than it was new that I found it undesirable. I don't recall exactly why I didn't like it at first, but in all fairness I will admit I didn't give it a chance. Only when a client called to schedule a Civil 3D 2010 update training class did I begin to use the ribbon. To my surprise I found it useful: it was easier to find some commands and I even discovered a ocuple of commands that had been in the product for years that I had never noticed before. I was hooked! That was even before I realized how useful the contextual ribbon was, especially in Civil 3D. After I realized the usefulness of this almost magical ribbon, I really started digging into it. I then tested the speed of using the ribbon versus the menu bar and found that it seemed to be faster as well. Now I love (or at least really like) the ribbon!

Customize User Interface
Now that I’ve told you why I like the ribbon so much, let me tell you how to customize it so it is exactly what you want it to be. The Customize User Interface editor, or CUI, is where you will find a lot of your customizations in AutoCAD these days, and it is where we will be customizing the ribbon as well. What we will be customizing is a workspace. Workspace is a collection of tools and commands and how they are arranged on your screen, or, in some cases, not displayed at all. Our focus will be on the customization of the ribbon itself, but I urge you to experiment with some of the other options for customization in the CUI.
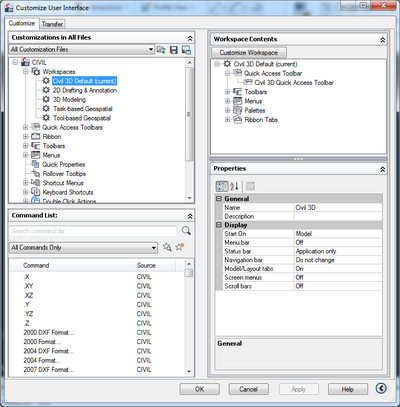
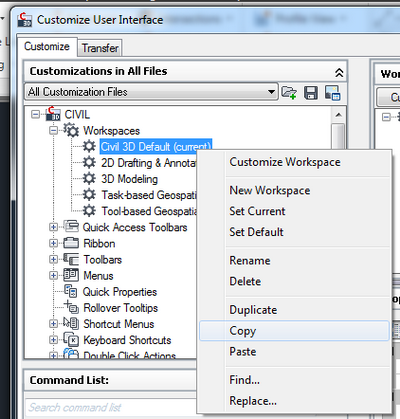
To get started customizing our ribbon or workspaces, type in "cui." Once the customize user interface editor opens, you will see workspaces located at the top. This is what we will be customizing. We also have the option of creating new workspaces, or copying one of the existing workspaces and then customizing the copy, retaining the original workspaces. I suggest that create a copy and modify it instead of changing one of the defaults, until you are comfortable with making changes in the CUI. Pick one of the workspaces and right click, to choose copy, then right-click on the copy and set the copy to current, or edit the one you have set to current.
Toolbars
Users often ask me about the toolbars. Well, they are still in the software, at least for now, they are just not as easy to access. I wouldn't be surprised if they disappear altogether one day, but for now they remain. While the toolbars are here, I'll tell you how to access them and how to add them to the ribbon as well if you so desire.
There is a "sweet spot" below the ribbon and above the drawing area. Click there (it might take several clicks) you will get the option to "add toolbars." I will tell you this can be difficult at times - I have clicked and found it on the first try and I have clicked 30 times and not found it. It is very hit and miss with this function. Once you have one toolbar showing, dock it and it will function normally.
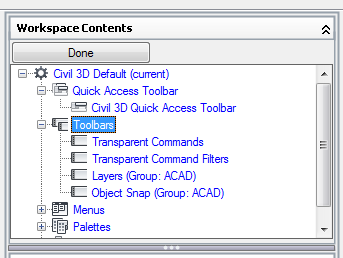
Another option is to go into the CUI and add the toolbars here. Choose a workspace to customize on the right side and while in customization, go back to the right side, expand toolbars and select the ones you want, then click done. You will very likely have to expand the partial customization files located at the bottom of the list to find the toolbars you would like to activate. This method is a little easier than the first option!
Last, you have the option of turning the toolbars into a ribbon panel. Right-click on a toolbar and select copy to ribbon. Once this has been done, you can copy the new panel to an existing ribbon tab, or create a new tab to place it on. You could create an entire ribbon tab that holds all of the toolbars you like. This is probably the best option, as it is more likely to work long term and keep you using the ribbon instead of using out-dated tools. The tools are still the same tools, there really just located in a different spot and slightly rearranged - they will no longer be in a long strip.
Tabs, panels, and commands
We also have the option of removing, adding, or changing the tabs, panels, and commands on the ribbon. You will find the options for making these changes in the CUI. There are so many options for changing these pieces of the ribbon that I can barely touch on the possibilities. We can delete portions and commands or an entire panel if we want. We can rearrange every part of the ribbon - from where the commands are located and in which order, and the same goes for the panels and tabs. We can copy, rename, and delete them.
You can change the way your command icons look and if they will have text. Pick some commands and see what options you have. The options are located in the properties section that appears in the lower right of the CUI when you select a command. If your company layer names are longer than the space provided in the ribbon by default, change it. The options are almost endless!
Partial customization files
One tip is that some of the changes can only be made in the lower set of customization files. This is particularly true with Map 3D. I have a tip to make this a little easier. While customizing a workspace you can check to see where you should be making your changes by looking at the list in Workspace contents - some of these will belong to one group or another. For example, Map task-based workspace changes need to be made in the task-based ribbon CUI, as shown below. You will notice that after the ribbon tab's name is additional information, which is showing where the ribbon or other feature is located and where the changes need to be made.
.png)
Quick access toolbar
The quick access toolbar is also very useful and any command can be added to it, even directly from the ribbon. While hovering over a command on the ribbon, right-click and select "add to quick access toolbar." Another way is to select the drop-down on the right side of the QAT and then select more commands, Drag and drop the ones you would like to have located here.
Have fun experimenting with your ribbon customization!