Inventor: The Nuts and Bolts of Nuts and Bolts
If you read my July column, then hopefully by now you are questioning everything in your design process. In the spirit of change, I thought that I would produce a little bit of advice on an area that is often overlooked when it comes to productivity.
Workflow studies have determined that as much as 70 to 80+ percent of many assemblies are composed of fastener-type components, which include screws, bolts, nuts, washers, and others. Because of the extremely high number of these type of components, it stands to reason that we might just be able to effect our greatest efficiency change in this area.
Why is this important?
The way that we create, place, constrain, and manage fasteners has a big impact on both user productivity and file sizes. This article will briefly cover these areas to help you gain a better understanding of just how this all works. When you consider that possibly 80,000 or more components in a 100,000-part assembly may be fasteners or fastener-related components, it's a very big deal.
OK, I know you hate the Content Center!
Maybe you have been unable to get the Content Center installed in previous versions, or perhaps you have had issues with network connection speeds and other things that have delayed the implementation of Content Center. Fear not - your days of being rejected by the dreaded ADMS Content Center installation are over! Simply install the new Desktop Content Center on your local drive, and be off and running. Now, with Inventor 2010, you can use either interchangeably.
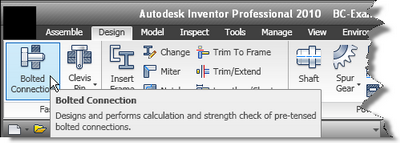
Using the Design Accelerator is essential to achieving full productivity when inserting standard fasteners. The Bolted Connection Wizard does virtually everything for you in many cases. In addition, it minimizes the number of assembly constraints when placing a fasteners set. The four images directly below illustrate the ease at which you can place a hole feature and all of the associated fastener components all at the same time.
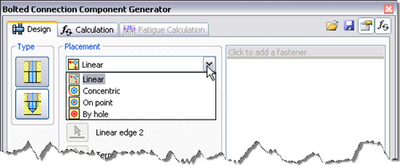
Multiple connection placement choices
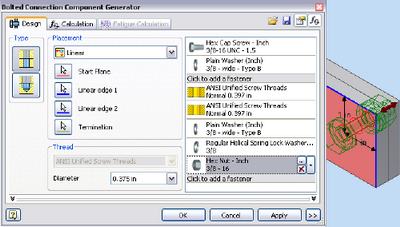
The bolted connection generator allows component selection (click on image to enlarge it).
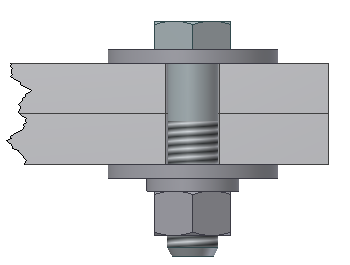
Cross-section showing all generated components
Speed Demon
Just for kicks, I timed the creation of this bolted connection. From start to finish, it took 38 seconds to create the hole, place the bolt, washer, bottom washer, lock washer, and finally the nut. That time includes constraining every component into proper position. Not fast enough? Well, once you have one bolted connection created, you can create a template for the rapid creation of additional connections in even less time. Here's how.
- Right Mouse Click on the Bolted connection that you would like to reuse. Select -Edit using Design Accelerator.
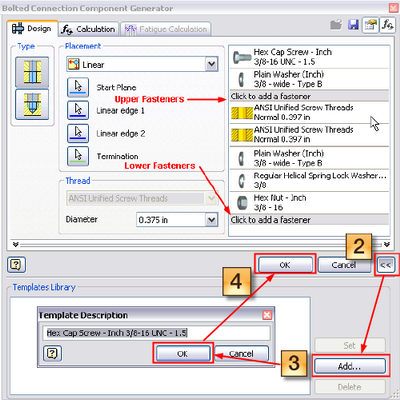
- Pick on the << Carat to expand the Dialog.
- Select Add to create a template of this connection. Please note that if you make changes to the connection, the Name description and the components in the template will automatically update.
- Pick OK to create the template.
-
Pick OK to Exit the Dialog. The template is now available for reuse.Simply select the top face while in the Bolted Connection Wizard, in your template options will appear for selection. After selecting the template, pick the bottom face, then pick Apply, or OK to exit the wizard.
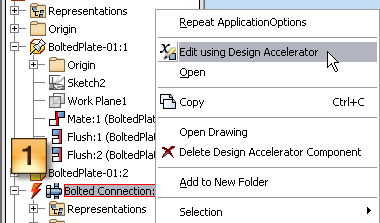
1. Right Mouse Click on the Bolted Connection to Edit
Click on image to enlarge it
What if I change something?
If there's one aspect of Mechanical design that will never change, it's constant revisions of a design. Using the Bolted Connection Wizard, it's quick and easy.
In my example design, I have two 3/8-inch steel plates that are joined together with bolted connections. What happens to the bolted connections if I replace the 3/8 inch steel with one half-inch steel? The initial result of this replacement will require a global update of the assembly to update the plates to the proper thickness. This will then cause the bolted connections to actually sink into the plates by a quarter of an inch overall. This is clearly a problem... or is it? What if I have 15 bolted connections already in place?
The issue is actually fairly simple to fix. Simply activate one of the bolted connections and update the connection. You will know which ones to change because there is a lightning bolt icon in front of the connection needing to be updated. If you have created a template to place the additional bolted connections, you will notice that the template itself will update with the proper length for the bolt needed for the increased thickness.
Where are all the constraints?
Here's the good part! There are only two constraints exposed at the top level of the assembly for each bolted connection. The constraints binding the rest of the components together in the assembly are hidden within the bolted connection. This minimizes the number of total exposed constraints.
Good design and assembly practice demands that sufficient subassemblies be created within the top-level assembly in order to "bury" the maximum number of constraints exposed at the top-level assembly. "Hiding" the majority of constraints at the top level allows for a lower memory footprint and reduced CPU cycles caused by constant reevaluation of constraints. In other words, better performance in assemblies.
Use of the Content Center and Bolted Connections allows the use of Level of Detail - All Content Center Suppressed for rapid placement of 2D views, while still allowing for the possibility of an accurate parts list showing all components.